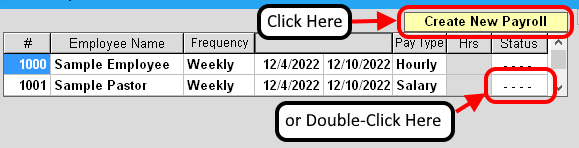
- Change Status to PENDING for each Employee that will need a new Payroll check created.
This can be done in 2 ways:- Click the CREATE NEW PAYROLL button, (see above image)
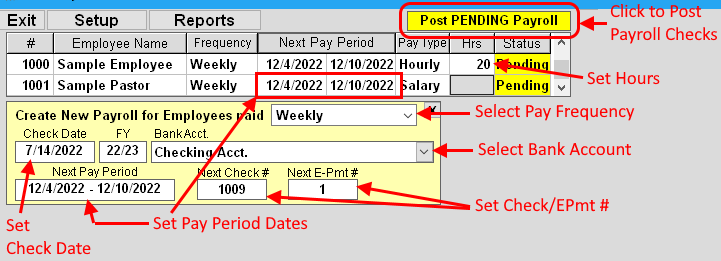
then select the PAY FREQUENCY from the drop-down menu.(see image below)
After doing so, you will see the STATUS next to each employee with this Frequency change to PENDING. (unless the employee already has Payroll for the indicated period) - Double-Click in the STATUS column for the Employee. (see above image)
Double-clicking again will reset the Status.
DO NOT select PAY FREQUENCY from the drop-down menu. (see below)
or
- Click the CREATE NEW PAYROLL button, (see above image)
- Set the NEXT PAY PERIOD dates.
This can be done on each Employee line or in the CREATE NEW PAYROLL box.
Click the START or END Date and select from the Calendar. - Verify/Enter the HOURS for Hourly paid Employees. (skip this step for SALARY type Employees)
DO NOT include Vacation or Sick time hours in this box. - Set the CHECK DATE.
Click in the CHECK DATE box and select from the Calendar. - Select the BANK ACCOUNT that will be Debited for the Payroll checks.
- Verify/Enter the NEXT CHECK # and/or NEXT E-PMT #.
These are the #s that will be used when the Checks are created. - Click the POST PENDING PAYROLL button.
The STATUS column will change to PAID for each Employee that has a new Payroll created.
If changes need to be made after new Payroll checks are posted, then see the topic HOW TO EDIT below.
More Payroll topics: