Use the following instructions for both a Regular/Paper Check and an Electronic Check (E-Payment).
- On the Checkbook screen, click the "Check" or "E-Payment" button.
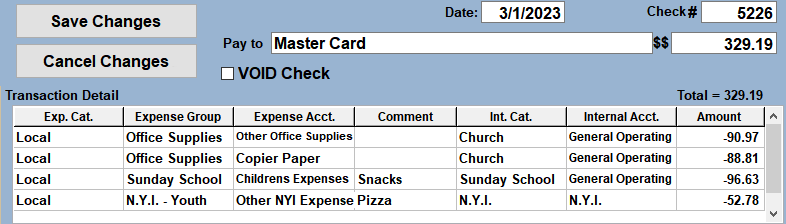
- Verify that the Date is correct. To change the Date, click on the date and select the correct date from the calendar. Double click on the day or press Enter to set the date. Optionally, use the Quick Date Change keyboard shortcut.
- The Check # is automatically populated based on the last used #. To change the #, click inside the check # box and type the #. Press the Enter key to go to the Payee box.
- Type the first few letters of the Payee Name in the Payee box and then select the applicable name
in the Drop-down Payee List. Press Enter when the Payee Name is highlighted.
If this is a NEW Payee, type the FULL Payee Name, then Click the "Save As New Payee" button or press Enter. Optionally, Fill-in Address, Phone, Account # boxes, then Click "Save Payee Info" button.
- Type Check $ Amount, then press Enter or click the
 button.
Optional: If this check is the same as or similar to a previous check to this payee, use the Recall feature to quickly fill out the check. After using the Recall feature, skip to step 14. - Fill-in MEMO box if needed, locatd below the Payee box.
- Next, Fill-in the first Transaction Detail information Line. (located below the MEMO box)
Press the Enter key after making each selection.
The First 3 columns will specify how to categorize the type of Expense and should answer the question:
"What am I paying for?" - Select the Expense Category in the far-left column from the drop-down list. To quickly locate a line, type the first letter or two of the name.
- Select the Expense Group/Sub-Category.
- Select the Expense Account.
- Type an OPTIONAL Comment in the Comment box.
- The Next 2 columns will specify the INTERNAL ACCOUNT that will be debited for the Expense and should answer the question: "Where will the money come from to pay for this Expense?"
- Select the Internal Category.
- Select the Internal Account.
- Type the $ Amount for this line if less than the entire Check Amount. Press Enter
- If there is more than one line of Expenses to be posted for this Check, then repeat the steps above to Enter another Detailed transaction line below the first one and continue this process for any additional lines needed.
- If you would like to include a MEMO note for the Check, then Click inside the MEMO box and type the MEMO.
- When the TOTAL $ of the Transaction Detail lines EQUALS the Check Amount, then the SAVE CHANGES button should be highlighted and enabled. Press the Enter key or click the button to finalize Posting the Check Transaction.
If you do not want to save a check, click the Cancel Changes button to delete the entry or press the ESC key.
If the Payment to this Payee will be recurring, then you may want to Add this Payment to the Schedule. See below.
For more information see: