- From the Contributions Screen, click on Reports and then Receipts.
- The current calendar year will automatically be selected. To change the date range to a different year or time frame, click on the Start or End date buttons to change the dates. (Clicking the left or right arrow buttons on the calendar with the RIGHT mouse button will change the date to the next or previous year.)
-
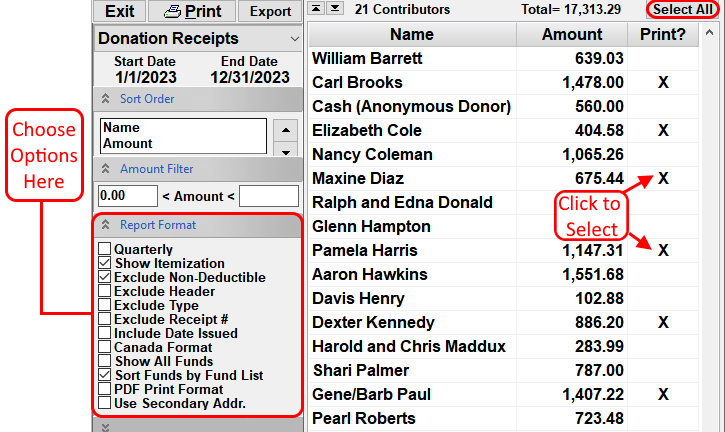
There are multiple report format options available. Choose from the following options for the
receipts:
- Show Itemization - This option shows all contribution amounts by date, including the amounts necessary for IRS purposes. This option is checked by default.
- Quarterly Format - This option will print the amount given on the receipt broken down by quarter. This option is selected by default. This can be used with any one year time frame that begins on the first of the month.
- Exclude Non-Deductible - This option will exclude all non-deductible contributions. Non-Tax Deductible contributions will not be included on the receipt.
- Exclude Header - This option excludes the header section. The church name, address and phone number will not be printed. (This is for users who want to use church letterhead instead of plain paper.)
- Exclude Receipt # - This option excludes the receipt # from the header. A receipt number will not be printed.
- Exclude Type - This option excludes the contribution type (Check, Currency, Goods, etc) from the detailed listing of contributions. (Only available on NTS version 4.94 and above.)
- Canada Format - For Canadian churches, this option will print the information required by the Canada Revenue agency. The church's Charity BN/Registration # needs to be entered into the Federal ID box in the Church Information setup so that this number will be included on the receipt.
- Show All Funds - This option will print all funds on the contribution receipt, even funds that a contributor did not give any money to. (Only available on NTS version 5.10 and above.)
- Sort Funds by Fund List - By default, the funds are listed on the receipt in alphabetical order. Use this option to have the funds appear in the same order as in the fund list. (Only available on NTS versions 5.10 and above.)
- PDF Print Format - Check this option if the receipts are to be saved as PDF documents. Requires a PDF printer to be installed on the computer. See Printing PDF Reports for more information on PDF printers. (Only available on NTS versions 5.70 and above.)
- Use Secondary Addr. - Check this option if you want to print receipts with the secondary instead of the primary address. The primary address will be used if a secondary address does not exist. (Only available on NTS versions 5.70 and above.)
- Select the Signature lines that need to be printed on the receipt. NOTE: Signatures are NOT required by the IRS for tax deductibility. Select from either the pop up menu or type in a custom signature line name in the white signature line boxes. See the link below for more information. With NTS version 4.70 and above, it is possible to include a digitally printed signature on the receipt.
- For information about mailing receipts to Contributors in windowed envelopes, see How do I setup Contribution Receipts for windowed envelopes?
- By default, only contributors that have contributed money are shown on this screen. To print a receipt for every contributor listed, click the Select All Names button. Otherwise, double click on any name to select or unselect contributors. If using the arrow keys to move up and down the list, pressing the space bar will select or unselect contributors. To quickly find a contributor, press the first letter of their last name to go to the contributors that have a last name starting with that letter.
-
Click the
 button in the upper left corner to print
the selected receipts.
button in the upper left corner to print
the selected receipts.
In NTS version 4.50 and above, all print settings are saved when exiting this screen. The chosen settings will automatically be selected the next time this report is opened..
For more information see: