
Table of Contents
To create a report:
- Choose the ** New Report ** option from the Report Name box at the top of the screen.
-
A box will appear with 3 options:
- Standard Annual Report - Select this option to create a new annual report. Internal accounts will be automatically linked to the report. No expense accounts will be linked.
- Blank Report - This option will create a report without any expense lines or income columns.
- Copy report from prior year - This option will allow you to copy a report from the previous year. After you click this option, a box will appear from which you can choose the report you want to copy.
- Type the name you want to use for this report in the Report Name box.
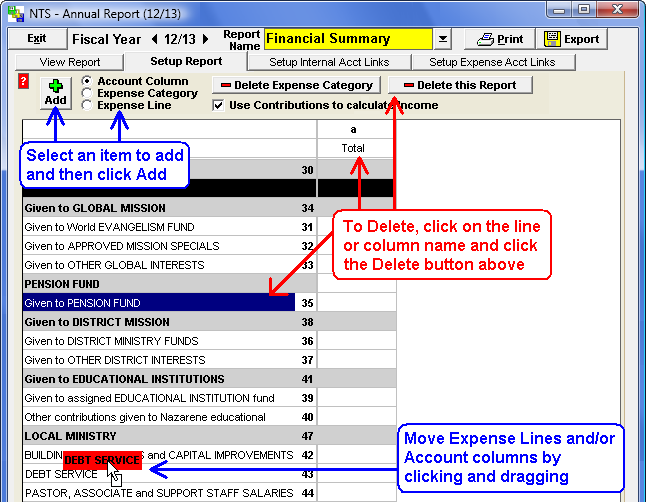
Click on the Setup Report tab to make changes to a report. There are 2 main sections of the report, Expense Lines/Categories and Account columns. Each line and column on the report will have a code that can be used to reference that column or line. On the Setup Report tab, you can add, delete, or move any of these items on the report. See below for more information.
To Delete a report, click the Setup Report button at the top of the report screen and then click
the  button.
To view a report:
- Select the report you want to view from the Report Name box which is in the center at the top of the screen.
- Click the View Report tab or button.
- Each report can have a title. Type the title name you want for the report in the Report Title box.
- To set a date range other than the entire fiscal year, click either the start or end date of the report date range and select the date(s) you want from the calendar that appears.
-
To the right of the Report Title box, there are 3 additional settings:
- Show Linked Internal Accounts/Show Linked Funds - This option shows the accounts or funds which were used to calculate the income.
- Show Linked Expense Accounts - Click this option to view the expense accounts linked to each expense line of the report.
- Show Dollars w/cents - Check this box to see the cents instead of the standard rounded amounts.
This report also has the drill-down or detail boxes feature which allows you to get more information about the number you see on the report. Double-Click on any amount on the report, either income or expenses. If you click on an income number, all of the internal accounts that are linked to that column will appear on your screen. The amounts for each account will appear as well. Double-Click on an amount for one of the internal accounts and a list of the individual transactions for that account will appear on your screen.
Double-Click on an expense amount and all the expense accounts linked to that amount will appear. Just as with the internal accounts, you can click on any numbers on the lines for the expense accounts and a list of all the individual transactions will appear.
To export the report, click the Export button in the upper right corner of the report Screen. A dialog box will appear. Choose the location to save the file, type in the desired name and then click Save.

Account columns can be used to categorize your income. The standard annual report only has one column into which all income is combined. Adding a new column can only be used when the "Use contributions to calculate income" option is not checked.
To create a new column:
- Click the Setup Report Tab to view the setup page.
-
Click the Account Column option at the top of the setup page and then click the
 Add button.
 - Type in the name for the column over the default "New Column".
- To move the column to a different location, click on the column name and drag it to the desired location. See the illustration in the Setup Expense Categories and Lines section below.
To delete an account column, click on the column name and then click the
 button at the top of the
screen.
button at the top of the
screen.
To rename an account column, click on the column name and type in the new name. The code for each column is above the column name on the report. Note that the code for the account column is set automatically and can not be changed. If you move a column, you will need to change any formulas that referred to that column, as the column code will have changed. See the Setup Formula information below.
See below for more information on linking Internal Accounts to an account column.
Setup Expense Categories and Lines
Expense lines and categories are designed to group your expenses. The standard annual report has 4 categories and 14 expense lines. Like the account columns, the expense lines and categories have a code that can be used to reference the line. Expense Category lines will appear with a gray background and expense lines will have a white background.
To add and expense line or category:
-
Select the item you want to add, either a line or a category, at the top of the report and then
click the Add button.
- The new line will appear at the top of the report. Click on the text "New Expense Line" and type in the name you would like to use for the new category or expense line.
- At the end of the box with the name, type in the code you want to use for this new line.
- To move the category or line, click and drag the category or line to the desired location on the report.
To delete an expense line or category, click on the name of the line or category and then click
the  or
or
 button at the top of the screen.
The codes for the expense lines are not automatic and can be changed by you. The codes can contain numbers and/or letters and should be no longer than 6 digits. The codes are case sensitive which means the code "R" is not the same as "r". It is possible to have 2 expense lines, or an expense line and an account column, with the same code. This is not recommended as it will produce unreliable results in the report formula box.
The Grand Total line for expenses can have specific codes to reference the total for each column. Click inside any box on the Grand Total line and then type in the code you want for the total. The codes should follow the same guidelines as above.
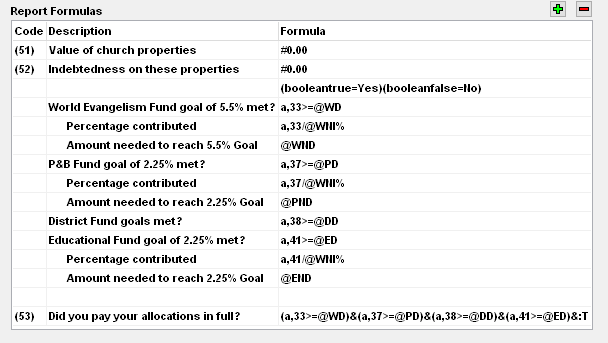
The formula section of the report allows you to make calculations based on any of the numbers in the report. When you initially setup a new annual report using the standard format, NTS will automatically create the necessary formulas in the report for calculating your allocations. These are the standard formulas required by the Church of the Nazarene.
The report formula box has three sections: Code, Description, and Formula. The code is used to reference the result of the formula on that line in a later formula. As in the standard annual report formulas, the results of lines W and X are referenced in the formula on line Y. See the example below. In the description box, you can enter any sort of description you want. This box can also be left blank. The formula box is where you can enter in a formula to perform calculations on the numbers in the report. See below for more information on creating custom formulas.
Both the code and the description will be visible on the report. That includes what you are able to view on-screen and on the printed report. The formulas will not be visible on the View Report screen or on the printed report. Only the result will be shown.
To add/delete a new Formula line:
- Click the green plus button to add a new line.
- To delete a line, click on the line to delete and then click the red minus button.
Here are the standard formulas for fiscal years 2016/2017 and beyond:
Here are the standard formulas for fiscal years 2014/2015 to 2015/2016:
Custom formulas can be created on the report to make your own calculations. The report will calculate formulas following the standard order of operations. All arithmetic formulas will return a value good to at most 2 decimal places. It will only calculate the 2 decimal places if the "Show Dollars w/cents" option is selected. Here is a list of the operators you can use to create your own custom formulas. Instructions on using the operators are below.
- ( ) - Parenthesis to group operations
- + - * / - Add, subtract, multiplication or division
- = and <> - Equal to and not equal to
- ^ - Exponent
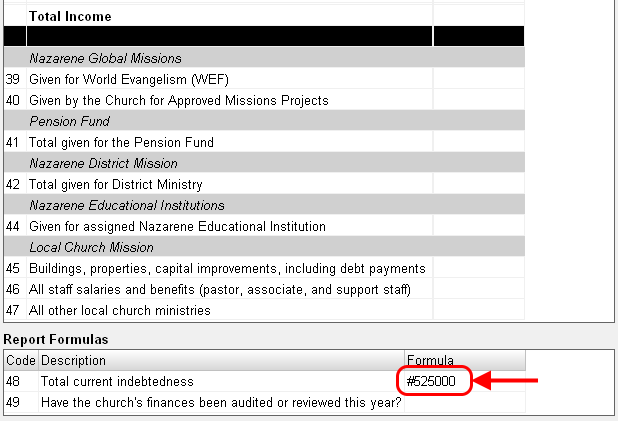
- # - Specifies a literal number (see below for more information.)
- > and < - Greater than and less than signs
- >= and <= - Greater than or equal to and less than or equal to signs
- &= - Logical Operator: AND
- | - Logical Operator: OR
- :T or :F - Logical Value: true or false
- (booleantrue=Custom_Value) (booleanfalse=Custom_Value) - Set Test Return Value.
- @TD - Allocations Total Due - Total due for all Allocations
- @ND - Total Net Due to meet all Allocation goals
- @TP - Total paid on all Allocations
- @WNI - World Evangelism Fund Net Income - Income after exemptions have been subtracted from Total income
- @WD - Total Due for World Evangelism Fund
- @WND - Net Due for World Evangelism Fund - Amount needed to meet WEF goal
- @PD - Total Due for Pensions & Benefits
- @PND - Net Due for Pensions & Benefits - Amount needed to meet P&B goal
- @ED - Total Due for Education Institution Fund
- @END - Net Due for Education Institution Fund - Amount needed to meet Education Fund goal
- @DD - Total Due for District Fund
- @DND - Net Due for District Fund - Amount needed to meet District goal
To create formulas, you can reference amounts on the report by their code.
Example: a,33+a,34+a,35 Add the totals on expense lines 33, 34 and 35.
Example: a,32-(a,33+a,34+a,35) Subtract the total from the above example from the number from the total church income. To reference an amount on the report, type in the code for the column followed by a comma and then the line number. In our example, the Total Church Income is a,32. If you have more than one income column, use the code for that line, i.e. 32, to reference the amount in the "TOTAL" column.
Example: a,32-a,48 Subtract from the Total Church Income (column 'a', line 32) with the total paid on All other church ministries (column 'a', line 48). Note that the codes are case-sensitive, so 'a' is not the same as 'A'.
Example: a,33*#1.5 Multiply the amount in column a, line 32 by 1.5. To indicate a literal number and not a code, enter a pound sign (#) before the number. In the formula, you are limited to 4 decimal places. If you use more than 4 decimal places, the number will be rounded.
Example: (38+39)(41-42) This is an INCORRECTLY formatted formula. There are NO implied operations. Anytime that you do not format a formula correctly, NTS will return zero as the result. So given this formula, the report will return a zero as the result. For the report to properly calculate this formula, it must be entered in as (12+13)*(14-15).
Example: B>=A As in the Did you pay your allocations in full?, you can create
formulas using logical operators that will return a value of true or false. You can also have
formulas that look like the following: (X/W)<(Y-Z)
Using the logical operators, you can create more complex logical operations. The following
example will only return true if both comparisons are true. Example:
(a,33>=@WD)&(a,37>=@PD)
Exponents must be whole numbers, no fractions or decimals.
The special operator @ followed by the corresponding 2 or 3 digit code retrieves the specified amount from the Allocation report.
Logical operations will return a value of either "True" or "False". You can change the value that the formula will return. As in the standard annual report, the formula returns either Yes or No. To set True equal to Yes, enter into the formula box "(booleantrue=Yes)". To set False equal to No, enter into the formula box "(booleanfalse=No)", see the formula setting example above. Both settings can be entered into the same formula line. These settings only effect formulas below the line where the change is made and remain in effect until the settings are changed again.
You can change the return values multiple times. So for one formula you might want to use Yes and No, and on the next formula you might want to use True and False. So after the first formula and before the second formula, add a line and change the return values again using the booleantrue and booleanfalse settings.
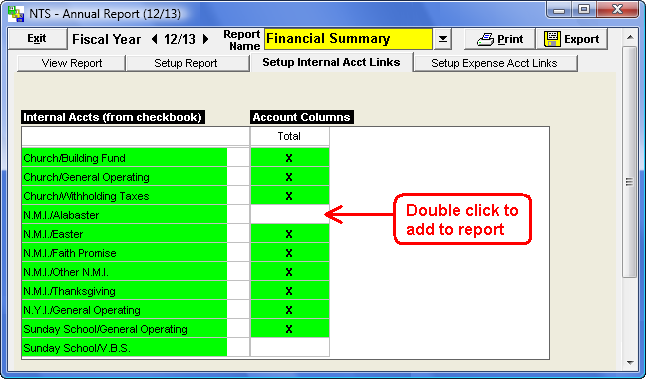
To setup Internal Account Links:
- At the top of the Annual Report window, click on Setup Internal Account Links. On the Setup Internal Accounts page, you will see a grid with a list of all your internal accounts down the left side of the grid.
- Double-click in the Total column to add an account to the report. Optionally, click in the total column and press the space bar. As a general rule, all accounts should be linked to the report.
- To remove a link, double click on the 'X' for that account or select the box and press the space bar to remove the link.
- To save your changes, click the View Report button.
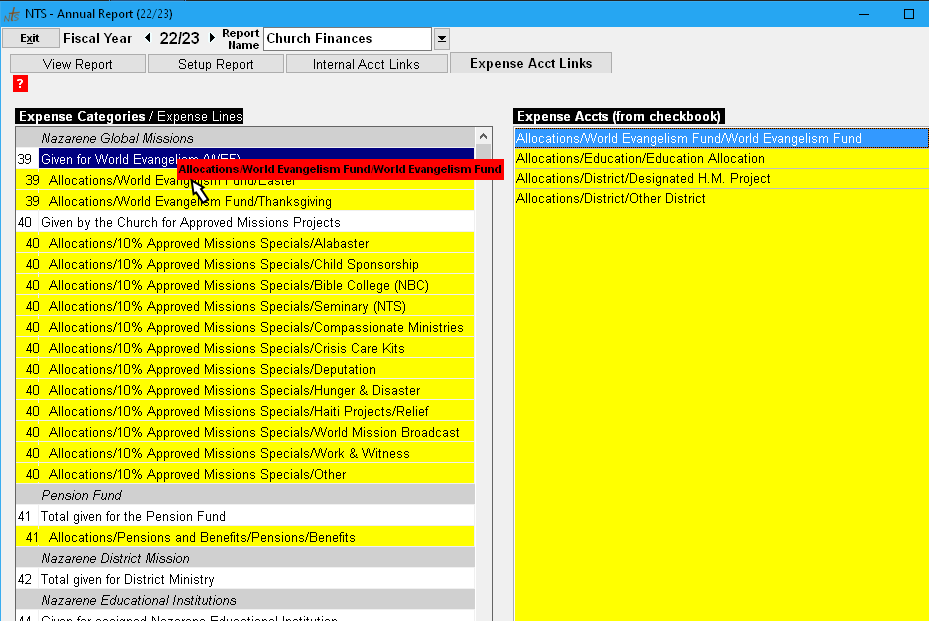
At the top of the window, click on Setup Expense Account Links. On the Setup Expense Accounts page, you will have two lists. On the left side will be a listing of all the expense line items on the Annual Report and all the expense accounts currently linked to the report. The white lines are the Annual Report expense lines and the yellow lines are your expense accounts. At the end of each line, you will see the number or code assigned to each line.
On the right side of the screen is the list of all your expense accounts that are not linked. Accounts that are not linked are not included on the Annual Report and are not included in the totals on the report.
To Link Expense Accounts:
-
Click and drag an account and drop it on the expense line (white lines) you want to link it to.
You can also drop the account on any other account that is linked to the same expense line.
After you drop the account, the code for the corresponding expense line will appear at the end of
the line. This allows you to verify that the account is correctly linked. See the illustration
below.
Note: To quickly link an expense account to the expense line you just added an account to, select the account and press the Space Bar on your keyboard.
- If you drop the account in the wrong place, click and drag the account up or down in the list and drop it in the right location.
- To remove or exclude an expense account from the report, click and drag the account over to the list of expense accounts. Any account listed on the right will be excluded from the report.
- To save your changes, click the View Report button.
This message tells you when you have accounts that are not linked to the annual report. It will tell you exactly how many expense and internal accounts are not linked. Accounts that are not linked will not be included on the report. This will produce a report that does not include all of your financial data and therefore could be incorrect.
