To Setup Check Printing, see the link at the bottom of this page.
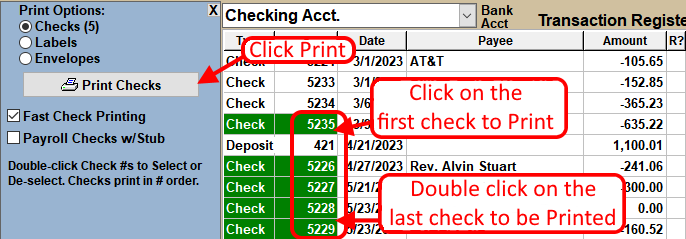
- Select Check(s) to be Printed. Click on the Check # in the Transaction Register on the Checkbook screen.
- Click the
 button below the Transaction Register.
A Print Options box will appear on the Left side of the screen. - Double-Click any additional Checks that you want to Print. Selections will be shown in GREEN.
- Confirm that the Fast Check Printing option box is CHECKED. If this box is not Checked, then you will be taken to the CHECK SETUP screen before Printing.
- Select the Payroll Checks w/stub box if you would like to Print the Payroll summary information on the stubs of "Check +2stubs" style Checks. This option will ONLY affect Payroll Checks.
- Click the
 button in the Print Options
box.
button in the Print Options
box.
NOTE: If using "3 to a page" Check style: If one or two Checks have been removed from the sheet, then do not select more than one or two Checks for printing.
For more information see: